Join Components
Overview
Join combines multiple components into a new assembly, using a selected base component as the main part. This is useful for creating custom assemblies such as duct fittings with attached doors, test ports, drains, supports, or other accessories.
To use Join, select a base component and then choose one or more components to join to it. The command creates a new assembly consisting of the base and all selected components. Options are available to automatically name the new assembly, adjust its origin, and add automatic part numbering for better organization and tracking. The demoted assembly uses the default "standard" template in the Inventor templates folder.
How It Works
- Select the base component (the "main" component of the new assembly).
- Select additional components to join to the base.
- Choose naming/origin/part-number options.
- Create the new assembly. Component positions remain unchanged.
Options
Auto Name
Auto Name uses the original base component root name and prefix, along with a unique index, to name the new assembly. If unchecked, you can manually enter an assembly name and optionally use Auto Increment to add a unique index.
Adjust Origins
Adjust origins places the new assembly's origin at the base component's origin. If left unchecked, the new assembly origin is placed at the original assembly's origin. Component locations remain unchanged in both cases.
Add Part Number
Add Part Number enables automatic part number updates based on the base and joint components. The suffix is appended to both the part number and description, helping distinguish custom assemblies.
Note: To add part number, Normal BOM must be selected.
Usage Instructions
- Open your assembly in Inventor.
- Click the Join button in the Construct panel.
- Click Select Base Component and select the base component.
- Click Add Components to Join and select additional components.
- Set options for naming, origin, and part number if required.
- Click Create Assembly to generate the new assembly.
Troubleshooting
- New assembly is not created: Verify that a base component and at least one join component are selected.
- Naming conflicts: If manually naming, ensure the new name does not collide with an existing file (use Auto Increment when appropriate).
- Part number not updated: Confirm the BOM structure is Normal and the files are editable.
Examples
Create a custom duct fitting: Join a straight fitting with doors, test ports, or drains to make a unique assembly.
Auto-name assemblies: Use Auto Name and Auto Increment to quickly generate unique file names.
Update part numbers automatically: Enable Add Part Number for dynamic part number management.
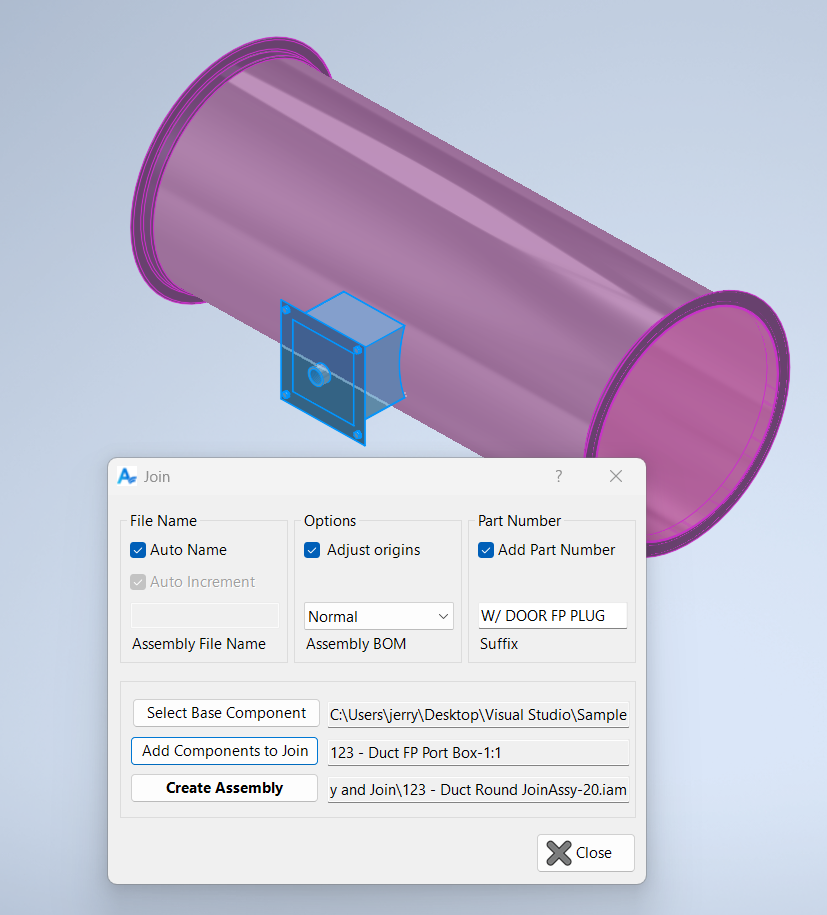
In the clip below, click Select Base Component and you are prompted to select a base component, in this case the duct (purple is selected). Next click Add Components to Join to select all additional components you want jointed to the base, in this case the plug for a fire protection coupling is selected (highlighted blue below). Once Create Assembly is clicked, a new assembly is created consisting of the duct and the door.